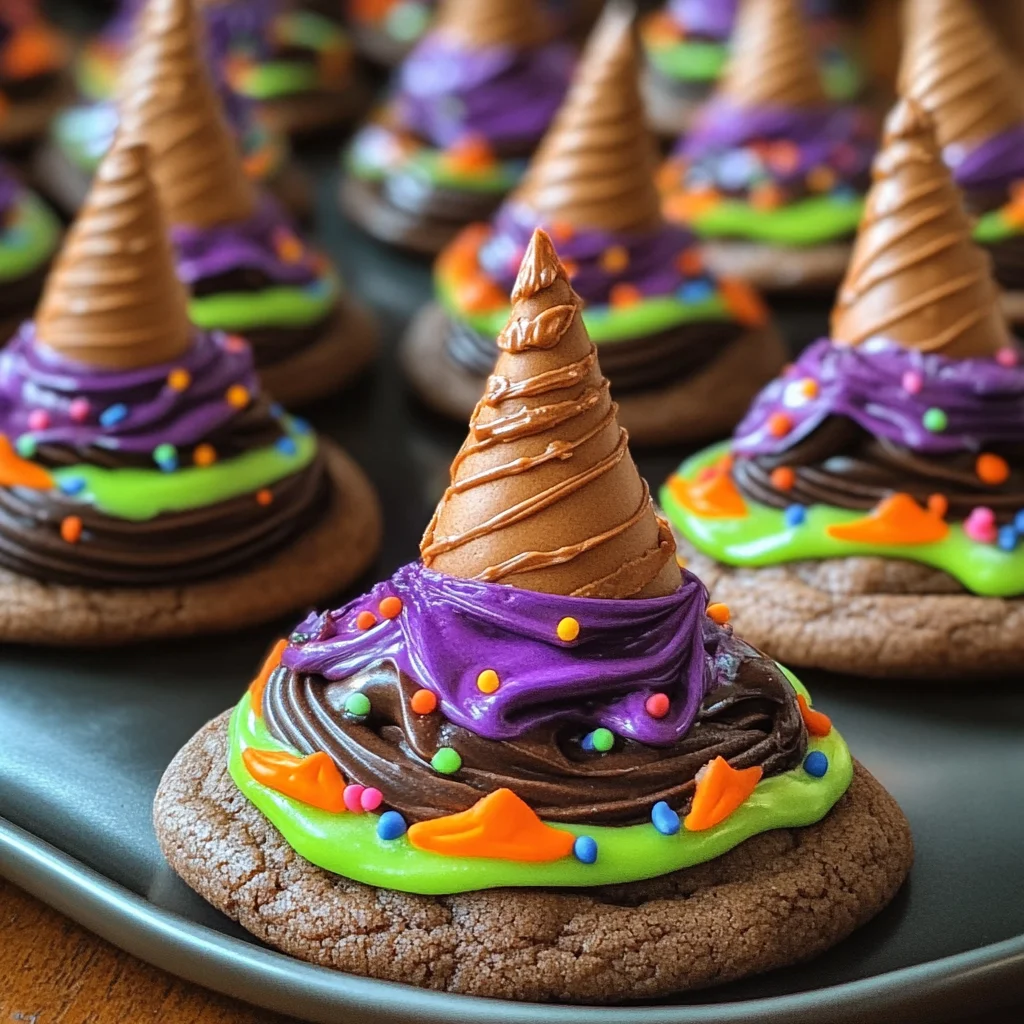
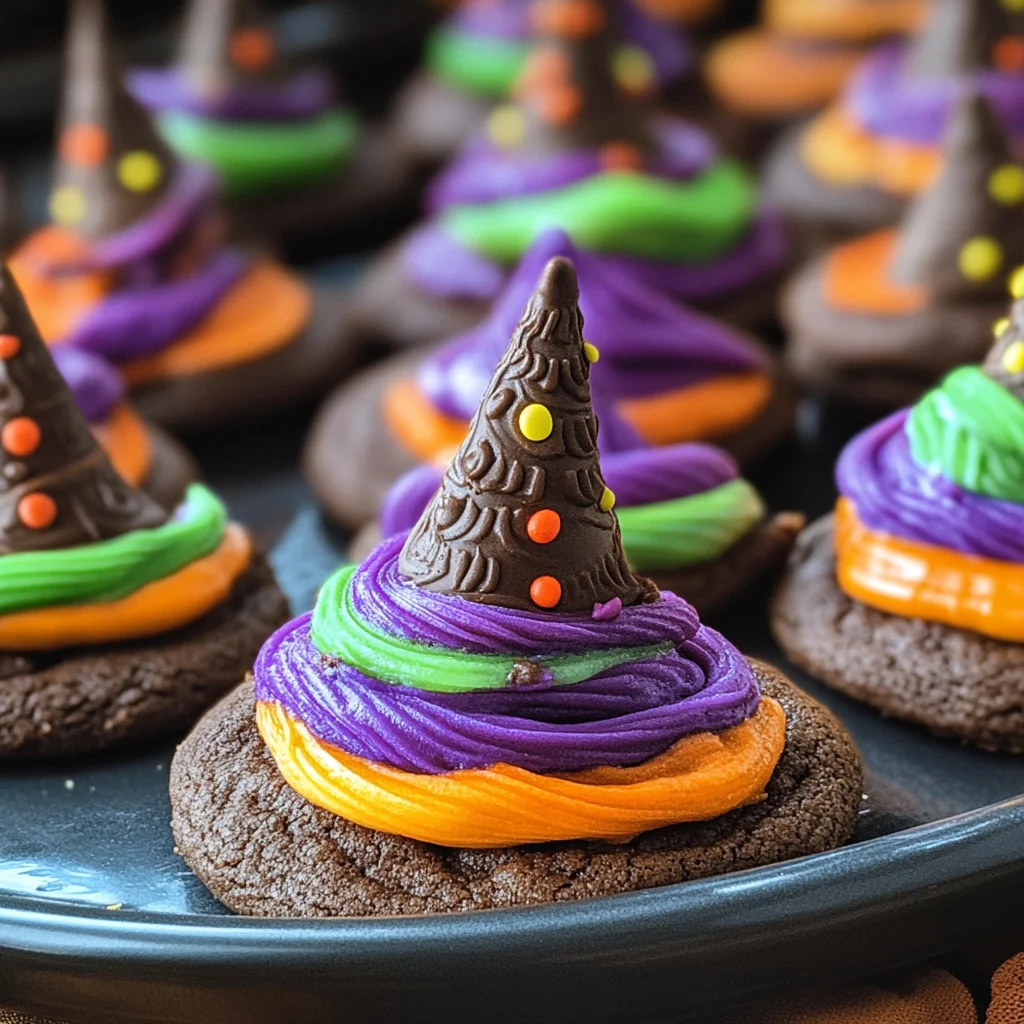
Halloween Witch Hat Cookies
These Halloween Witch Hat Cookies are a delightful treat that will enchant your guests this spooky season. Perfect for Halloween parties, these charming cookies are not only fun to make but also easy to customize. With their chocolaty goodness and creative design, they’re sure to be a hit with both kids and adults alike!
Why You’ll Love This Recipe
- Fun for Everyone: This is a great activity for kids and adults to enjoy together, making it perfect for family gatherings.
- Customizable Design: You can easily change the colors and decorations to match your Halloween theme.
- Deliciously Chocolaty: The combination of cake and chocolate cookies creates a rich flavor that everyone will love.
- Eye-Catching Presentation: These witch hats make for an impressive dessert display that will wow your guests.
- Quick Preparation: With just a few simple steps, you can whip up a batch in no time.
Tools and Preparation
To create these Halloween Witch Hat Cookies, you’ll need some essential tools to ensure everything goes smoothly. Having the right equipment will make the process easier and more enjoyable.
Essential Tools and Equipment
- Cupcake Cones Baking Rack
- Cookie Sheet
- Parchment Paper
- Decorating Bags
- Spatula
- Knife
Importance of Each Tool
- Cupcake Cones Baking Rack: This tool holds the sugar cones securely while baking, ensuring they maintain their shape.
- Decorating Bags: Perfect for piping icing, these bags allow you to create detailed designs on your cookies.
- Spatula: A spatula helps smooth out icing, giving your witch hats a polished look.
Ingredients
For these delightful Halloween Witch Hat Cookies, gather the following ingredients:
For the Cookie Base
- Favorite Cake Mix or Try Wilton’s Chocolate Cake Recipe
- Store Bought Chocolate Cookies or Try This Recipe from Wilton
For the Icing Decoration
- Lemon Yellow Icing Color
- Black Color Mist Food Coloring Spray
- Rose Icing Colors Pink Food Coloring
- Violet Icing Color, Gel Food Coloring
- Golden Yellow Icing Color
- Orange Icing Color
For Assembly
- Sugar Cones
- Creamy White Decorator Icing, 4 lb. Tub
How to Make Halloween Witch Hat Cookies
Step 1: Prepare & Bake the Cones
- Prepare the cake mix by following the instructions from your chosen recipe.
- Place the cupcake cones baking rack on a cookie sheet.
- Insert the sugar cones into the rack and fill them with 2 tablespoons of cake batter.
- Bake and cool according to your recipe’s timing instructions.
Step 2: Spray the Cones
- If needed, trim any risen cake from the top of each cone using a knife.
- Place the cones wide side down on parchment paper.
- Using Black Color Mist food coloring spray, coat each cone black.
- Allow them to dry for about 10 to 15 minutes.
Step 3: Tint the Icing & Prepare the Bags
- Tint 1 cup of creamy white decorator icing orange.
- Combine violet and rose icing colors to tint another cup purple.
- Prepare two decorating bags with tip 2B filled with orange and purple tinted icing respectively.
- Tint ¼ cup of creamy white decorator icing yellow by mixing golden yellow and lemon yellow colors; place it in a decorator bag with tip 3 attached.
Step 4: Assemble the Witch Hats
- Pipe a small amount of orange icing in the center of each cookie and place a cone on top.
- With the smooth side of tip facing out, pipe an orange band around half of the cones; smooth with a spatula.
- Repeat with purple icing on the remaining cookies and cones; let set for about 15 to 20 minutes.
- Finally, use yellow tinted icing with tip 3 to pipe buckles around each hat’s band; let set another 15 to 20 minutes before enjoying!
How to Serve Halloween Witch Hat Cookies
These Halloween Witch Hat Cookies are not only visually appealing but also deliciously fun. Here are some creative ways to serve them at your Halloween gatherings.
Individual Treat Bags
- Use small, clear treat bags to package each cookie. Tie with an orange or black ribbon for a festive touch.
Halloween Dessert Table
- Arrange the cookies on a themed dessert table, alongside other spooky treats like ghost cupcakes and pumpkin pie.
Ghostly Cupcake Cones
- Serve these cookies atop vanilla or chocolate cupcake cones for a delightful combo that adds height and whimsy to your presentation.
Trick-or-Treat Goodie Bags
- Include these cookies in goodie bags for trick-or-treaters, along with candies and small toys for an extra surprise.
Themed Plates
- Use plates with Halloween designs to serve the cookies. This enhances the spooky vibe and makes for great Instagram photos.
Cookie Decorating Station
- Set up a decorating station where guests can add their own icing or sprinkles to the cookies, making it a fun activity for kids and adults alike.
How to Perfect Halloween Witch Hat Cookies
Perfecting these Halloween Witch Hat Cookies will ensure they stand out at any party. Here are some tips to elevate your cookie game.
- Use fresh ingredients: Ensure all cake mixes and icings are fresh for optimal flavor and texture.
- Check consistency: The icing should be thick enough to hold its shape but soft enough to pipe easily. Adjust with powdered sugar or milk as needed.
- Practice piping techniques: Before decorating, practice piping on parchment paper to get comfortable with the icing bags.
- Let them set: Allow the decorated cookies time to dry properly before serving; this helps maintain their shape and prevents smudging.
- Experiment with colors: Feel free to mix additional colors for unique designs that match your party theme.
- Store properly: Keep the cookies in an airtight container at room temperature to maintain freshness until serving.
Best Side Dishes for Halloween Witch Hat Cookies
Pairing side dishes with your Halloween Witch Hat Cookies can create a balanced dessert spread. Here are some fantastic options that complement the spooky theme.
-
Pumpkin Soup
A creamy pumpkin soup brings warmth and is perfect for chilly autumn evenings. -
Spooky Veggie Platter
Arrange vegetables like carrots, celery, and bell peppers into ghostly shapes served with a dip in a carved-out pumpkin. -
Witch’s Brew Punch
A non-alcoholic punch made from fruit juices and soda can be a refreshing accompaniment that fits the theme perfectly. -
Ghostly Pizza Bites
Mini pizzas topped with cheese cut into ghost shapes add savory goodness alongside sweet treats. -
Mummy Hot Dogs
Wrap hot dogs in crescent roll dough to create mummies; they’re easy to make and fun for kids! -
Caramel Apple Slices
Slice apples and drizzle them with caramel sauce for a sweet treat that contrasts nicely with the chocolatey cookies. -
Cheesy Bat Wings
Chicken wings coated in cheesy sauces offer a savory option that balances out the sweetness of your dessert table. -
Candy Corn Salad
A colorful salad featuring corn, bell peppers, and cheese mimics candy corn while providing crunch and brightness to your spread.
Common Mistakes to Avoid
When making Halloween Witch Hat Cookies, it’s easy to make a few common errors. Here are some tips to ensure your cookies turn out perfectly.
- Skipping the Cooling Step: Allowing your cake cones to cool is crucial. If you skip this step, the icing may melt and lose its shape.
- Overfilling the Cones: Filling the sugar cones too much can lead to overflow during baking. Stick to 2 tablespoons of batter for best results.
- Not Using Parchment Paper: Failing to line your workspace with parchment paper can cause a sticky mess. Always prepare your area for easy cleanup.
- Ignoring Icing Consistency: The right icing thickness is key for decorating. Test your icing; it should be smooth but not too runny.
- Rushing the Decorating Process: Take your time when piping and assembling. Let each layer set before adding more decorations to avoid smudging.
Storage & Reheating Instructions
Refrigerator Storage
- Store your Halloween Witch Hat Cookies in an airtight container.
- They will last for up to 5 days in the refrigerator.
Freezing Halloween Witch Hat Cookies
- Place cookies in a single layer on a baking sheet until frozen solid.
- Transfer them to a freezer-safe container or bag, where they can stay fresh for up to 3 months.
Reheating Halloween Witch Hat Cookies
- Oven: Preheat oven to 350°F (175°C) and warm cookies for about 5-7 minutes, ensuring they don’t dry out.
- Microwave: Heat individual cookies on high for about 10-15 seconds; check frequently to avoid overheating.
- Stovetop: Use a non-stick skillet over low heat, warming cookies gently for a few minutes until they soften.
Frequently Asked Questions
What are Halloween Witch Hat Cookies?
Halloween Witch Hat Cookies are fun and festive treats made with chocolate cookies topped with cake cone hats, perfect for Halloween celebrations.
Can I customize Halloween Witch Hat Cookies?
Absolutely! You can change the colors of the icing or use different cookie types for variation. Feel free to add sprinkles or other decorations.
How do I store leftover Halloween Witch Hat Cookies?
Store any leftovers in an airtight container in the refrigerator for up to five days, or freeze them for longer storage.
What if I don’t have cake mix?
You can make your own cake batter using flour, sugar, eggs, and cocoa powder. Adjust ingredients as needed based on what you have available.
Final Thoughts
These Halloween Witch Hat Cookies are not only delightful but also versatile and customizable. Whether you want spooky colors or unique toppings, these cookies are sure to impress at any Halloween gathering. Give this fun recipe a try and let your creativity shine!
Halloween Witch Hat Cookies

Halloween Witch Hat Cookies are a whimsical and delightful treat that will enchant your guests at any Halloween gathering. These charming cookies, featuring a chocolate cookie base topped with colorful icing and cake cone ‘hats,’ are not only fun to make but also easy to personalize for your spooky festivities. With their chocolaty flavor and creative designs, they’re sure to be a hit among both kids and adults. Perfect for parties, these cookies can be displayed beautifully on dessert tables or packaged as individual treats. Dive into this festive baking project and create lasting memories with family and friends!
- Prep Time: 20 minutes
- Cook Time: 15 minutes
- Total Time: 35 minutes
- Yield: Approximately 12 cookies
- Category: Dessert
- Method: Baking
- Cuisine: American
Ingredients
- Favorite cake mix or homemade chocolate cake batter
- Store-bought chocolate cookies
- Sugar cones
- Creamy white decorator icing
- Gel food coloring (orange, yellow, violet, rose)
Instructions
- Preheat the oven according to your cake mix instructions.
- Prepare the cake batter and fill sugar cones with 2 tablespoons of batter.
- Bake until golden and let cool completely.
- Spray cooled cones with black color mist; allow drying.
- Tint the decorator icing in desired colors.
- Assemble by piping icing onto cookies and attaching cones to create witch hats.
Nutrition
- Serving Size: 1 cookie (45g)
- Calories: 180
- Sugar: 12g
- Sodium: 150mg
- Fat: 7g
- Saturated Fat: 3g
- Unsaturated Fat: 4g
- Trans Fat: 0g
- Carbohydrates: 28g
- Fiber: 1g
- Protein: 2g
- Cholesterol: 10mg